Laptop computer, mobile phone, almost every device—Mac, Windows PC, Chromebook, iPhone, and Android—has a built-in way to record your screen, but each one is different.
If you’re an iPhone or Mac user, you’ve probably noticed that it’s pretty easy to record your screen in just a few steps. Using a Windows computer or laptop, you may have to kick it old-school and use something like PowerPoint. (Yes, really.) And lord help anyone trying to screen record on an older Android device who isn’t a developer.
Whether you’re looking to screen record on a mobile device or your desktop, we’ve got you covered. Below are step-by-step instructions on how to record your screen.
The built-in functionality with these devices and operating systems are good options, but maybe you need to go beyond basic screen recording. If you’re looking for additional functionality (perhaps editing or multiple recording options), be sure to check out our post on the best screen recorders.
Contents1.How to Record Your Screen1.1How to Screen Record on Mac1.1.1Native Screen Record on Mac1.1.2QuickTime Screen Record on Mac1.2How to Screen Record on Windows1.2.1PowerPoint Screen Recording1.2.2Screen Recording Windows 10 (The Xbox App)1.3How to Screen Record on Chromebook1.3.1Native Screen Record on Chromebook1.3.2Vidyard Chrome Extension on Chromebook1.4How to Screen Record on iPhone1.5How to Screen Record on Android1.5.1Screen Record on Android 11 or Higher1.5.2Screen Record on Older Android DevicesHow to Record Your Screen
Simply put, a screen recording is when you record a video of what’s happening on your device screen.
There are several reasons why you may want to record your computer or laptop screen. A simple screen recording can be used to demonstrate how your product works to a potential customer—running into a technical problem while working remotely? Capture a bug to share with your Dev or IT team. Need to teach a colleague how to do something or onboard your new intern? Capture the workflow on your computer screen to make training easier. A hybrid screen recording (where you capture yourself and your screen) lets you build personal connections with prospects or share feedback with someone. You can even use it to save yourself from writing a long email.
When it comes to how to record your computer screen, you can use either a built-in screen record feature or download a screen recording software application or tool.
Most built-in screen recorders can:
Record a video of what’s happening on screenRecord audioSave the video, either to your device or the cloud
Some screen recording software (like Vidyard’s Chrome extension and Vidyard for Desktop) goes further and lets you capture a webcam video of yourself talking, displayed in a bubble alongside your screen recording, so you can add a personal touch to your explanation.
Free Screen RecordingEasily record and share your screen.Sign up with Business EmailGoogle LogoContinue with GoogleMicrosoft LogoContinue with MicrosoftGet It FreeHow to Screen Record on Mac
If you’re on macOS Mojave or higher, there’s a built-in feature for recording your screen and it’s as easy as pressing a hotkey. (This is why people like Macs.)
Native Screen Record on MacPress Command + Shift + 5Select whether you want to capture the entire screen, a window, or a selection (otherwise, it’ll begin recording the entire screen automatically)When done, click Stop to end the recordingYour recording will appear as a thumbnail at the bottom right-hand corner of your screen, click it to choose where to save the videoQuickTime Screen Record on Mac
Alternatively, you can use QuickTime, which is native on all Macs:
Open QuickTimeSelect File and then New Screen RecordingClick the red Record button to startTo stop, click the Record button againTo save, click File then Save
Pro Tip: If you only need to save a screenshot on Mac, press Command + Shift + 4 and select the area you want to capture.
How to Screen Record on Windows
Screen recording isn’t a built-in feature on a Windows PC like it is on a Mac. The easiest way to record your screen on Windows is to use PowerPoint.
PowerPoint Screen RecordingOpen PowerPointClick the Insert tab and select Screen RecordingSelect the area you want to record—to select the entire screen, press Windows Key + Shift + FClick the Record button, or press Windows + Shift + RTo end the recording, click StopWhen it’s over, you can save the recording as a video file (separate from the PowerPoint presentation)Screen Recording Windows 10 (The Xbox App)
Microsoft preloads the Xbox Game Bar on Windows devices so you can record video games, but it works just as well for businesses.
Type “Xbox” into the Windows search bar and open the appHold Windows + G on your keyboardClick Yes, this is a gameTo begin, click Record or press Windows + Alt + RTo end, click Stop
Pro Tip: If you only need to take a screenshot on Windows 10, press Ctrl + PrntScrn, select the area you want to capture, and release.
How to Screen Record on Chromebook
Chromebook now has a native screen recorder installed at factory settings but if you want more functionality like a video library, you can use an easy-to-access Chrome extension like Vidyard.
Vidyard’s Chrome extension is super easy to install. Once installed, the extension allows you to quickly record and share videos directly from your web browser. You’ll also have easy access to your existing library as well as a notifications feed to keep tabs on incoming video views and related video analytics.
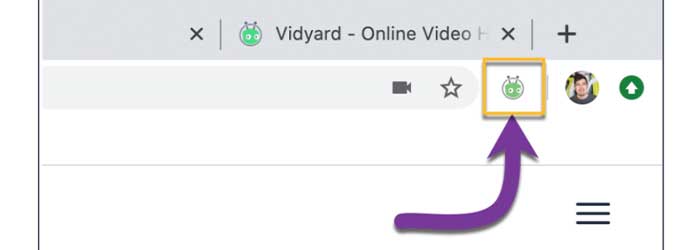
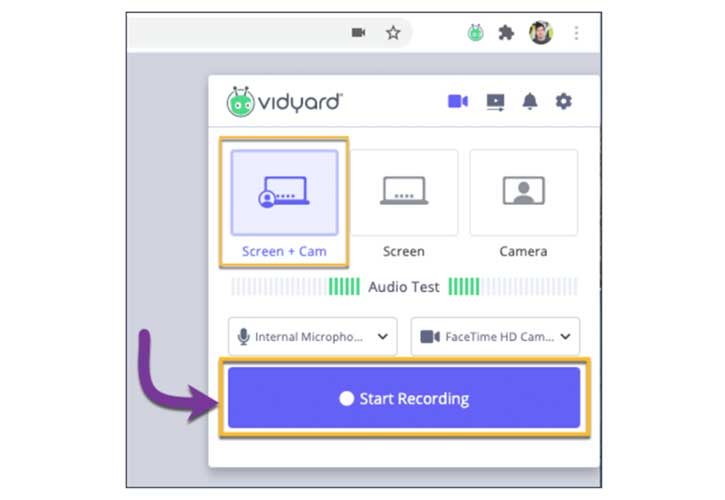
Native Screen Record on ChromebookPress Shift + Ctrl + Show windowsIn the menu at the bottom, select Screen RecordSelect an option:Record the full screenRecord a partial screenRecord a windowTo stop recording, at the bottom right, select Stop recordingVidyard Chrome Extension on ChromebookSelect the Vidyard extension in the upper right corner of your browser Pick the recording type that you have selected (this will determine what gets captured in your video)Screen: Records your computer’s entire screenCamera: Records a video using your webcam (a “selfie-style” video)Screen + Camera: Records both your screen and camera at the same time
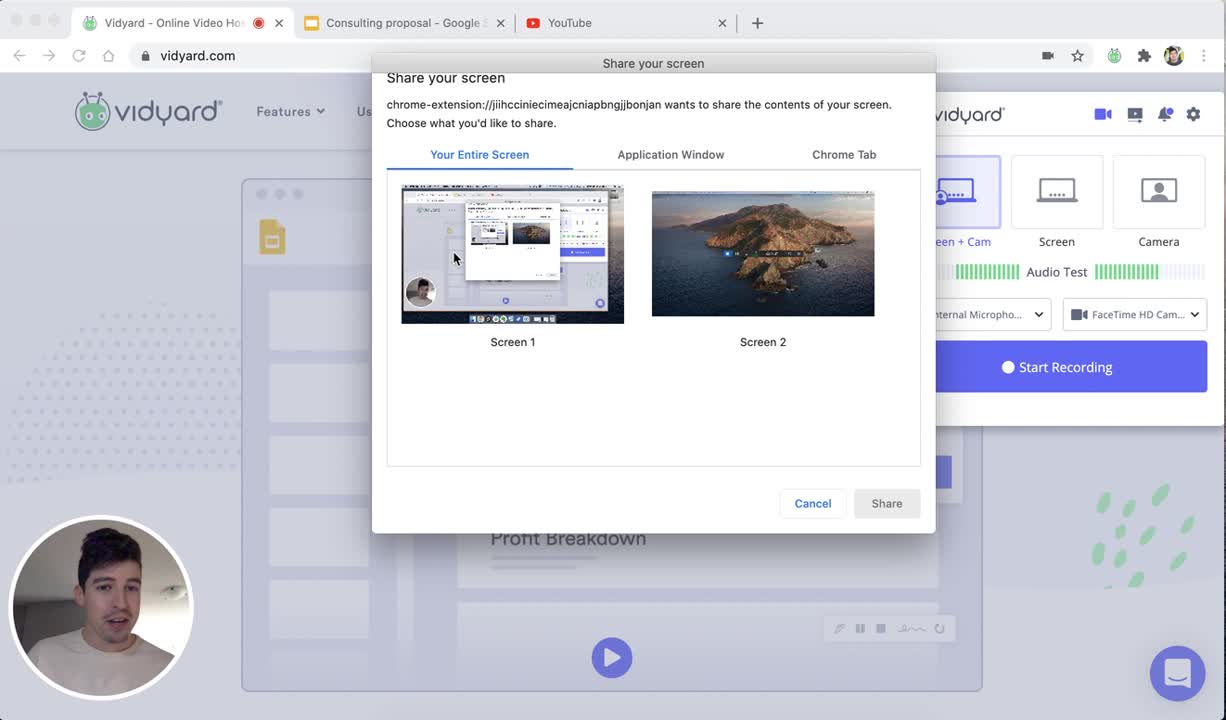
 Do an Audio Test to indicate that your microphone is working and able to pick up sound. To change the microphone or camera that you use to record, use the dropdown menus to select another available input sourceOnce you’re satisfied with the recording options you’ve selected, click onStart RecordingHow To Screen Record with Vidyard Chrome Extension
You can record videos and screen record in a few simple steps.
 How to Screen Record on iPhone
Most iPhones have a native feature for screen recording.
Go to Settings, Control Center, Customize Controls, and tap + next to Screen RecordingSwipe up from the bottom edge of the screen (if using an iPhone X, swipe down from the upper right corner of the screen)Long press on the circle record button and tap Microphone to enable audio recordingOnce you’ve done that, you can tap Start RecordingIf you’ve previously enabled your microphone (or don’t want to record audio), simply tap the circle record button (there’ll be a three-second countdown before your recording begins)A red Recording bar will appear at the top of the screen when your recording begins—when you’re finished, tap that bar to bring up the Stop screen recording? optionTap Stop to stop recording (or hit Cancel to continue recording)You can find your recording in your Photos app
Pro Tip: If you only need to take a screenshot on iPhone, hold the iPhone Home Button and press the Power button on the side. If you have an iPhone X or later, hold the Lock and Volume up buttons at the same time.
How to Screen Record on AndroidScreen Record on Android 11 or Higher
With Android 11 or higher, native screen record is included as an option and can be found in the quick settings area of your device.
Go to Quick Settings (or search for) “Screen recorder”Tap the app to open itChoose your sound and video quality settings and click DoneFor your first recording, it will ask for permission to access your device, prompt you to choose your sound settings, and give you the option to Cancel or Start recordingPress Start recordingHit the square stop button when you’re finished recordingYou can find your recording in your gallery or photos appScreen Record on Older Android Devices
If you’re running an older version of Android, you may be able to screen record, but it takes some digging to find and enable. To allow screen recording, you’ll need to enable your Android device’s developer mode.
Go to Settings, About Phone, and tap the Build Number button seven times—it will say, “You’re now a developer!”Return to Settings and select Advanced, Developer Options, then Feature Flags Toggle on settings_screenrecord_long_pressNow you’re set up to record your screenLong-press the screenshot button and it’ll bring up a popup menuTap Start Recording (a new popup will display)Tap Start NowTo end, tap Stop The video will show up in your default photo gallery
Pro Tip: If you only need to take a screenshot on Android, hold the power button and the volume down button at the same time.
If you need to move beyond basic screen recording and are looking for the best screen recorder for your business (free and paid), be sure to check out our post on the best screen recorders.
Free Screen RecordingEasily record and share your screen.Sign up with Business EmailGoogle LogoContinue with GoogleMicrosoft LogoContinue with MicrosoftGet It Free
This post was originally published on October 1, 2019. It was updated on September 17, 2021.
The post How to Screen Record on Mobile and Desktop appeared first on Vidyard.
Read more: vidyard.com
