
Macs have actually long had the ability to check out text on your screen aloud to you without downloads or third-party apps. This function has actually existed as Text to Speech, Speech, and as part of the VoiceOver function.
The function is now called Spoken Content, and it includes more controls than previous models, along with a variety of methods to personalize your experience with it.
Read on to find out whatever Spoken Content needs to use, and why you may choose to utilize it over the Speech choice in some Apple applications.
What Is Spoken Content on a Mac?
Spoken Content is an Accessibility function that exists on your Mac (with a comparable speech function on iOS gadgets also ). It enables your Mac to check out aloud text in word processing programs, sites, PDFs, and even ebooks in various ebook readers.
Some Mac apps, like Pages and Safari, permit text to be checked out aloud with the macOS Speech function , offered in the Edit menu in those apps. Speech isn'' t offered all over, while Spoken Content can be triggered through a keyboard faster way generally anywhere.

Speech can begin speaking and stop speaking, however that'' s about it. Spoken Content provides you a lot more control.
In addition to beginning and stopping its reading, you can stop briefly Spoken Content and have it get where it last ended. If you stop and begin it, speech will constantly reboot at the start of a text or highlighted area.
You can likewise alter the reading speed of Spoken Content whenever you desire, and choose which voice you'' d like it to check out aloud to you with. Spoken Content can likewise highlight words as you go, so you can follow along in the text throughout the reading.
All of this makes Spoken Content a little closer to third-party file readers , however it ' s complimentary and currently on your Mac!
It ' s not a totally ideal function, naturally. Spoken Content ' s voice alternatives are all quiterobotic, and the function can mispronounce words, names, and material like Roman'characters.
You may for that reason discover the reading experience tough or cumbersome to listen to for extended amount of times.You mayalso getused likewise it quickly utilized get a rapidly of enjoyment from this free satisfaction feature.
How to Set Up Spoken Content
To begin utilizing Spoken Content, you require to have it switched on. To turn it on, head to System Preferences> Accessibility,and choose Spoken Content fromthe sidemenu.

Check package beside Speak choice. When that ' s done, Spoken Content will be readily available to utilize!
There are more components to establish in the SpokenContentmenu under Accessibility ' s System Preferences prior to you begin to utilize the function.
One aspectis SystemVoice, which is the voice Spoken Content will check out aloud with. Select any choice from the System Voice dropdown menu and struck the Play button next to it to hear a sample of a voiceand choose if you like the method it sounds.
Once you ' ve picked a voice, select the Speaking Rate( the speed at which text reads aloud to you as soon as Spoken Content is triggered ). This can be modified as Spoken Content checks out, however if you choose a quick reading speed, youcan makethat the'default.
Move the marker along the Speaking Rate slider to set the default checked out aloud speed for Spoken Content. Clicking Play will let you hear a sample of this speed as you make your choice.
As we pointed out in the previousarea, Spoken Content is triggered with a keyboard faster way. This keyboard faster way normally defaults to Option+ Esc, however you can set the faster way to whatever you desire to streamline utilizing it or keeping in mind the faster way more quickly.
By clicking the Options button next to Speak choice you can likewise choose what, if anything, gets highlighted as Spoken Content checks out. You can likewise choose the color of the emphasize, any styling on the sentences reading out, and whether you can see the Spoken Content controlleras you utilize it.
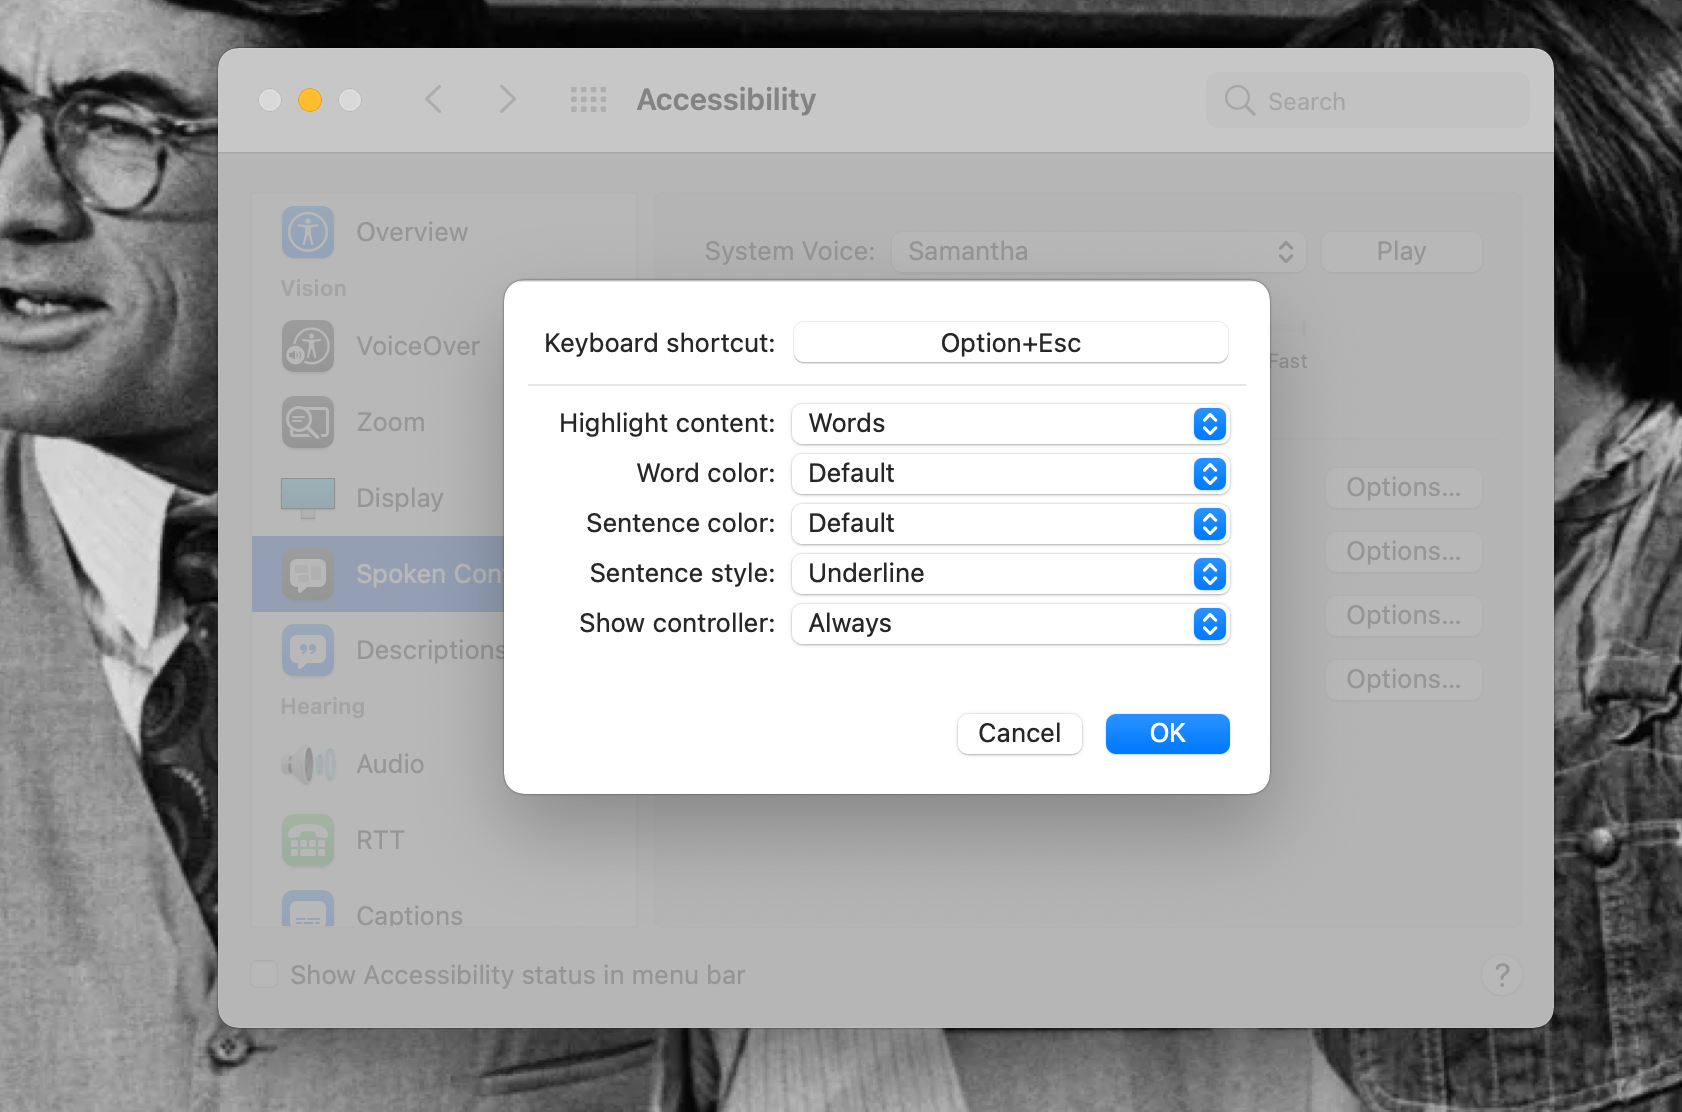
We ' d motivate having actually Show controller set to Automatically or Always, so you can utilize all of Spoken Content ' s manages as it checks out.
Always lets the controller remain on screen when you ' ve utilized the keyboard faster way when, so you can reactivate it without requiring to utilize the faster way once again. Vanish when hit struck Stop button on it, instantly willlet the controller disappear.
Letting Spoken Content emphasize text as it checks out is truly beneficial when reading out longertexts, as it lets you see where you remain in a file and assists you'browse to where you wish to begin checking out from later on. We ' ll review utilizing and browsing texts Spoken Content in the next area.
Utilizing Your Mac ' s Spoken Content Feature Once you have it material when, #ppppp> It ' s quite simple to utilizeSpoken Content. You require some text you desire to have actually checked out aloud. You require to browse in the text to where you desire Spoken Content to begin reading.
Navigate the text by clicking to the left of the very first word you wish to have actually checked out aloud or by putting your text cursor prior to the word, if you' rechecking out an editable text. Spoken Content will constantlybegin with the closest word you clicked near or had your cursor next to.
You can likewise highlight part of a text to have actually Spoken Content check out simply that part out, and not have it check out anything prior to or after.
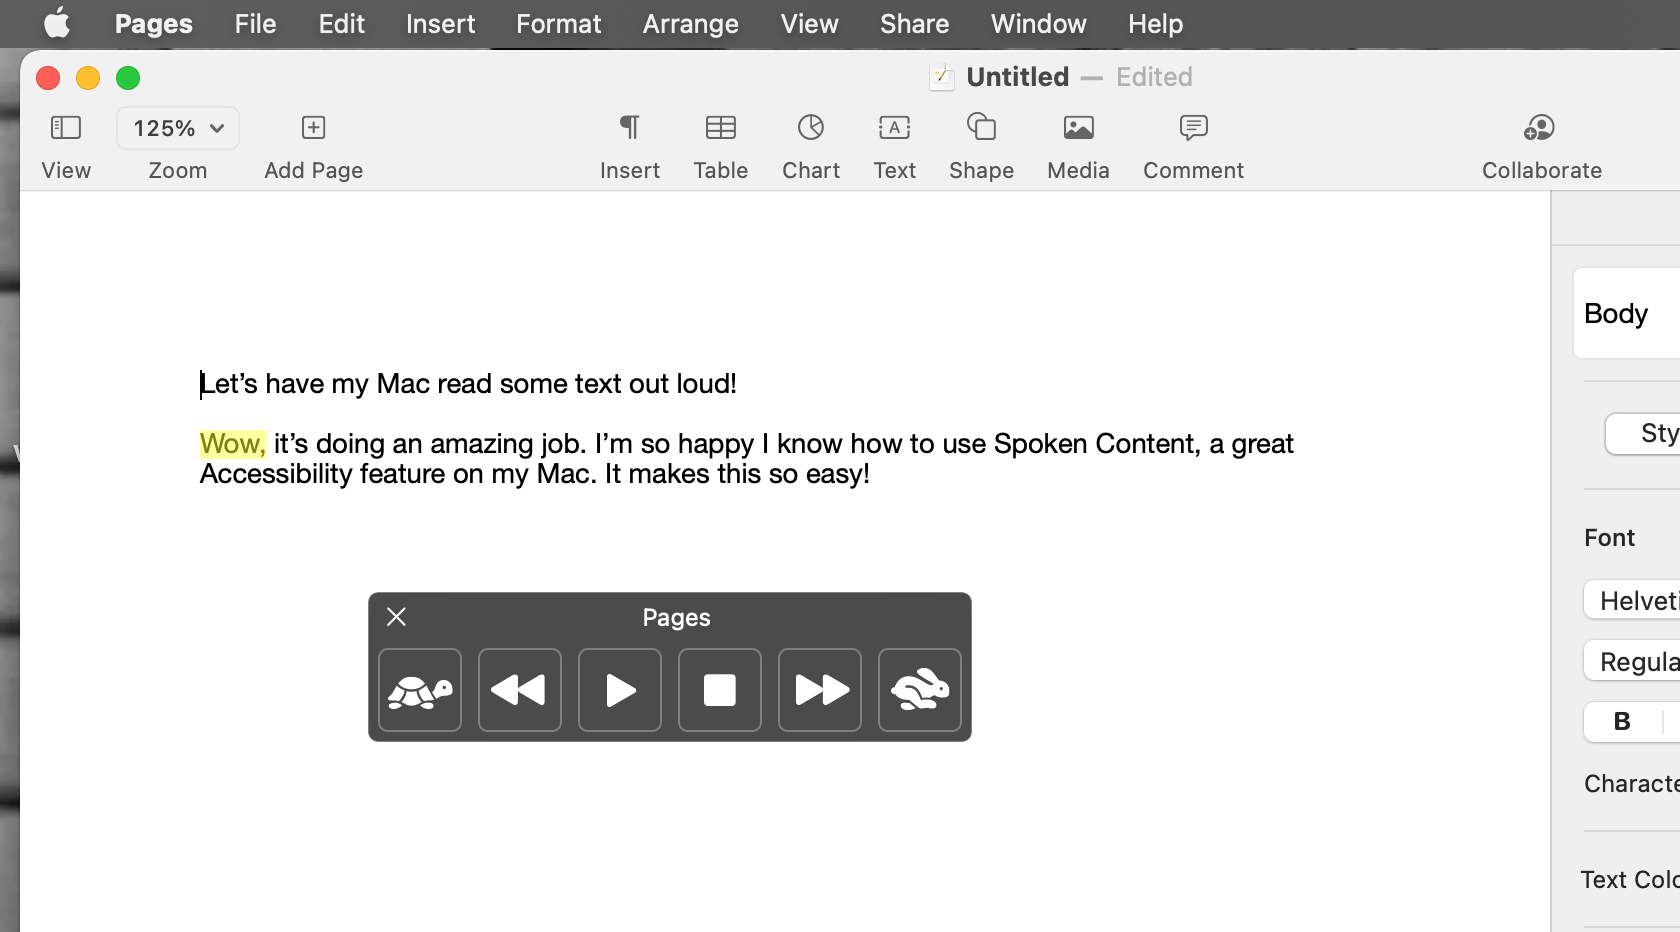
To make Spoken Content begin checking out, struck Option+ Esc, or whatever keyboard faster way you set for the function. The reading will start, and Spoken Content ' s controller will appear.
The controller will reveal the name of the application it ' s checking out from, in addition to a couple of buttons.The buttons do the following:
Turtle: Slow down Spoken Content ' s checking out rate. Rewind: Go back to the start of a sentence and check out from there.Play/Pause: Start or stop briefly Spoken Content ' s checking out. Striking Play after stopping briefly will reboot the reading where you ended, no matter where you ' ve clicked considering that. Stop: Stop Spoken Content ' s checking out totally.This lets you browse to a brand-new location in the text to begin'checking out once again, and will close the controller if you wear ' t have Show controller in SpokenContent ' s choices set to Always.Fast-Forward: Skip ahead to the next sentence and check out from there.Bunny: Speed up Spoken Content'' s checking out speed. 
The controller likewise has an X button to close it, which will stop Spoken Content from working till you type its keyboard faster way once again.
When Spoken Content checks outout loud to you, #ppppp> Use the controller buttons to control how and. Spoken Content will keep checking out till you struck the time outor stop buttons, or till it goes out'of text in a fileto check out.
This implies you can open other applications, or do other work while listening to Spoken Content. This is fantastic for bearing in mind on texts, andfor multitasking while utilizing your Mac .
But you can likewise simply sit andlisten totext with Spoken Content. It ' s a function you can utilize according to your own requirements and desires!
Start Listening to Text With Mac ' s Spoken Content Feature
Spoken Content is a terrific tool for listening to text on your Macratherof reading it. Whether you constantly have problem checking out files on a computer system or like how Spoken Content provides you the capability to multitask while you check out, it ' s a function you can begin utilizing really quickly.
We hope the above guide assists you begin utilizing Spoken Content.It 's really useful in a big range of scenarios, and even with a robotic voice it might seriously alter how you deal with your Mac.
Read more: makeuseof.com